After 3 years of ownership, finally had to do some real work on the TT, and when it rains, it pours — but more on that later. This Audi TT has one of the VW/Audi 1.8T variants, which means it uses a timing belt, and the replacement interval on these has dropped due to premature failure of the timing belt over the years. If the belt goes, so goes your engine — with bent valves at the very minimum. The manual states that it should be replaced every 105,000 miles, whereas the common knowledge now is 60-70k. I have no idea when it was done last, but if I’m going to do anything fun in the car, should probably take care of this.
The nice thing about owning a 15 year old car is that everything’s been done already by someone else, so I followed the excellent Timing Belt replacement guide by BlueTTop on the AudiWorld forum. I used the ECS Timing Belt kit with the Gates belt, and picked up a new Coolant Expansion Tank as mine was yellowed, and one 4-pin connector to replace a cracked housing on my 1st cylinder coil pack. Total replaced on the car included the aforementioned connector and coolant expansion tank, as well as the timing belt, accessory belt, tensioning pulley, tensioning dampener, water pump, and thermostat. For good measure, I also did an oil change.
I won’t go through every step of what I did, as the guide above did it far better than I, but just to highlight a few things…
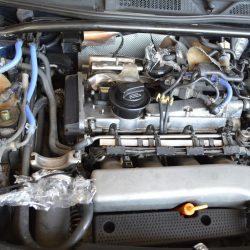
 |
| Everything was dirty. This is almost-before, with the charge pipe removed, but most everything else still in place. Notice the very yellowed coolant expansion tank in the upper left. |
 |
| Purchased an engine support bar from Harbor Freight for the occasion, as I’d have to either do that or get another jack, and felt this was safer if I had to buy something. Oddly, this was the most nerve wracking part for me, as I was so afraid of what would happen if something broke and the engine came loose. Note the trusty Bentley manual and what I’ve dubbed as “the tool tray” on the front of the car. |
 |
| When draining your coolant, make sure the hose is on all the way, or you get a garage floor full of coolant. Doh. |
 |
| The existing timing belt looks dry and old, but maybe the new one does already. |
 |
| There is not a lot of room to work with these connectors, and I have a feeling this is already an aftermarket harness. The Lisle 57750 wire terminal tool kit from Amazon did a great job here, and way cheaper than the VW/Audi tool. |
 |
| After everything was said and done, it sure looks a lot cleaner. I used Simply Green as I went to clean off parts as I disassembled and reassembled. I didn’t clean everything under the hood, as you can see by the battery tray, plastic surround, and some of the hoses. |
Honestly, this was a lot of fun. It’s a 1-2 day job that took me about a month in between job and kids and time with family, but it was nice to just work on one piece at a time, especially when I needed something calming. There were frustrating parts — bolts that were nearly impossible to get to (hello, bottom thermostat housing bolt), missing tools (bought a torque wrench that only went up to 30 lb ft, while the engine needs 33 and 40, and the wheels need 89), things that didn’t make sense (is that supposed to spin or no?). There were also fantastic parts, like when the timing belt finally went on, every TDC mark lined up, and after a few spins, still lined up.
The test drive after went well, except for not putting quite enough coolant in. A new problem cropped up, though. On one of my drives, all of this lit up:

ABS, Brake, ESP, and Alternator. Not a good sign. VAG-COM doesn’t help me, as I have another persistent K1 Short to Ground issue that pulling fuses is not helping me track down. Battery is putting out 12.5, but testing the alternator gave me over 16V. I guess there’s the problem. Either it’s the voltage regulator on the alternator, or something else in the alternator, or both… Next up, replace the alternator!